The Knights who say “Knit!”
So there are a few really cool crochet patterns for knight’s helms out there, but my crocheting skills are pretty rough. When I got a request to knit a knight’s helm for a nephew’s birthday gift, I thought I’d give a knitted version a go.
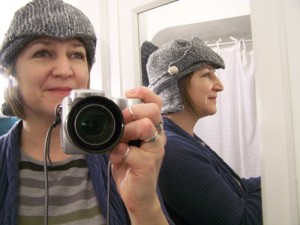
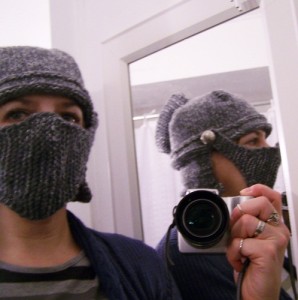
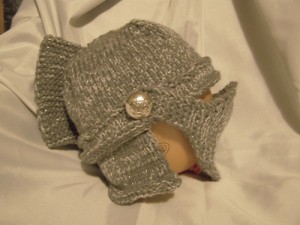
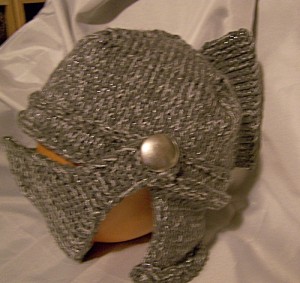
Here it is: (trust me, it looks better on my nephew!)
How hard could it be, right? As it turns out, it’s *not* all that hard, but since I gave the helm away and didn’t write the pattern down as I went, I’m going to give you the basic guidelines for making this helmet. I have already received requests for additional helms, and when I knit them, I’ll make a *real* pattern.
These guidelines are free to use for personal and non-commercial use.
First, the supplies:
Yarn: worsted acrylic so it can wash. I used Red Heart “with love” in pewter
Sock weight yarn – silver sparkly string (I’ve long ago lost the label on this one)
Needles: US #8 (5mm) cable needles – US #8 dpns – US #8 straight (optional, the cable needles can be used instead)
Tapestry needle
Crochet hook (optional)
I knit tight, so the worsted and the sock weight yarn together made a stiff fabric. But that’s good! A helm should be sturdy. If you’re a loose knitter, you might want to go down a needle size. I knit this for a 23″ head, but it fits a 21″ nicely too.
Hat:
I started with the hat, and any beanie pattern would do. So if you have a favorite, use it–however, I suggest no ribbing since helms are meant to be smooth. I decided I liked the decreases in the Turn A Square pattern by Jared Flood (free on Ravelry here) so that’s the hat I used, EXCEPT I modified it a bit:
Modifications: cast on 84 stitches. Didn’t bother to do the tubular cast on (used a long tail cast on) and purled the first 4-5 rows. I thought I’d leave that purled edge, but in the end, I rolled the purled edge up and it created such a nice border around the brim I left it up.
Neck piece:
To make the piece at the back of the hat that covers the neck, I put on the hat and marked the points above my ears. In retrospect, I might have come a little forward and marked points at my temples. Where ever you choose to mark, you will now pick up stitches (here’s where the crochet hook can come in handy) from one mark, all the way around the back to the other mark.
If you made the rolled up purl edge (like mine) pick up the stitches about 4 rows down from the top of the rolled edge, while the edge is rolled up.
Knit this flat in stockinette stitch, slipping the last stitch at the end of each row to give it a nice clean edge, until the piece that covers the neck measures 3-4 inches down from the edge of the hat. If you have the recipient handy, try it on them at this point. You want the neck piece to NOT to touch the shoulders. Bind off. My edge seemed to roll a bit, so once again, I just rolled it up about 2-3 rows, and did a quick basting stitch with the tapestry needle and gray yarn to hold it there. And happy accident–it made the bottom edge match the brim.
Visor:
When I make more of these helms, I’ll note the real steps to making the visor. I did not make button holes, but you could. The basic guidelines are:
Cast on 6 stitches and knit flat in garter stitch, slipping the last stitch of each row (with yarn in front) to give it a nice clean edge on both sides. You’ll want to attach the visor right where the hat and the neck piece join over the ear (or temple). For this hat, I knit those 6 stitches in garter stitch (slipping last stitch of each row) for about 2.5 inches, then did an increase row: knit 1, KFB (knit front and back), knit until last two stitches, KFB, slip stitch.
Knit 3 rows, work increase row, knit 3 rows, work increase row. Somewhere along the way, I increased 4 for the row instead of just two, knit 3 rows, worked increase (adding 4 instead of 2 stitches) and then knit for several rows. The idea is that you’re adding stitches at the ends of the rows to create the diamond that fits over the mouth and chin.
Once I was near the nose, I did the final increase of 8 stitches in the row (4 at the start, 4 at the end) and knit 4-5 rows. The piece should reach the center of the nose. I marked that as my center point, and basically knit and reduced to create the opposite side of the visor (you’ll ssk at the start of rows, and k2 at the ends of the rows to get the shaping correct.) I folded the piece in half to check my progress and to try to create an even second half. You will end with 6 stitches, knit 2.5 inches, and cast off.
Crest or Comb:
Cast on 10 stitches, knit flat in garter stitch slipping the last stitch of each row to make a nice clean edge. Knit until piece measures 6 or 7 inches. Bind off.
Bringing it all together:
Hat: I ran a basting stitch with tapestry needle and gray yarn (or just a quick stitch here and there) under the rolled up edge of the purl stitch to keep it in place.
Fit the visor by choosing a button with a looped backing. I pressed the looped back of the button through the end of the visor and sewed the button in place right where the hat and neck covering met, making sure the visor could slide up and rest on the hat, and slide down and rest over the nose. Repeat on the other side of the visor.
As mentioned above, I also rolled up the bottom edge of the neck piece and ran a basting stitch with tapestry needle and gray yarn to keep it rolled up in place. I only rolled up about 2-3 rows, so it’s a very thin “hem”.
Pin the crest/comb in place in the center of the head, down to the neck. Stitch it in place (standing up) by sewing the bottom edge firmly with tapestry needle and gray yarn to the hat.
Tie off & weave in all tails of the yarn, and you, my friend are now ready to defend the kingdom! (and to bring me a shrubbery.)


16 Comments
popcorn
freaking awesome. I really wish I knew how to knit cuz I want one now
Mashiara
wow. ditto the “freaking awesome.”
Shaineinok
I love it! Adding to my bookmarks in case my nephew ever needs one!
Rhyanna
This is fantastic, now to find a pattern like this for a flat-bed knitting machine like the Brother KH 930, KH 270 knitting machines.
Jacqy Beck
I would like to tried this pattern as I don’t crochet either as I was looking for a knitted pattern also as my son just ask me if I would be able to knit him a knight helmet. We look it up and it was a crochet and I told him I wouldn’t be able to do it as I only knit.
Joan Spengler
I would really like to make a few of these for Christmas for my grandkids. How can I get the pattern??
Devon
Hi Joan! There isn’t a pattern, as I didn’t note stitch count, etc. as I made this up. I did try to write down the basics of how to make one (in blog above) which basically comes down to knitting a beanie, knitting a flat piece for the neck guard that is later sewn on, knitting a flat piece for the comb which is later sewn on, and building a mouth guard by knitting for a short length, then increasing to create a point over nose and chin, and then decreasing.
I’ve been so busy this last year or more, that I haven’t had a chance to reknit this and make it into a pattern. Sorry! And good luck, if you give it a try!
Joan Spengler
My passion is knitting and crocheting. I think I can do a lot with what you have given me and I thank you so much. I am going to try it both ways! Thank you and thanks from my grandkids!
Sarah
How much yarn would I need for a hat?
Pingback:
Ann Ulibarri
Came across this looking for a pattern for hat..You have a doppelganger Me..love the knights hat.
Chris
Definitely looks best-in-slot when you need to stack frost resist! How long will it take the little knight to outlevel– er, outgrow it?
Pingback:
Pingback:
Pingback:
Pingback: